Install Ubuntu 20, VMWare 16, And Java 8 on Windows:
This article explains how to install Ubuntu 20, Virtual Machine 16, and Java 8 on your Windows system. It’s important to know the basic knowledge of Linux commands.
Prerequisites:
-
Minimum System Requirement:
- I5 Processor
- Minimum 8GB RAM
- Minimum 80 GB HDD or Min 128 GB SSD
-
Enable Virtualization:
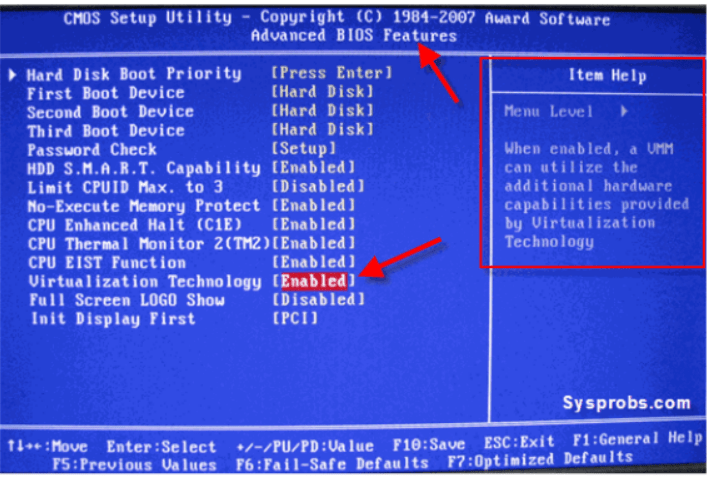
Check whether your Virtualization is enabled or not. If not, then go to your BIOS setting and you will see the option as below:
-
Download the softwares from the below links:
- VMWare Workstation 16 (Windows) click here
- Ubuntu 20 iso file and save it to a directory (D:\Softwares) click here
- Java 8 click here
- IntelliJ click here
- Eclipse click here
Now, after you have downloaded all the required softwares, the next thing is to install it.
-
Steps:
- Install VMWare Workstation. watch this video on how to install VMWare
- Download the Ubuntu iso file from the above link, we are going to use this file in our virtual machine.
- Now, Launch and Create a New Virtual Machine, and browse the Ubuntu iso file. provide the credentials and you are done.
- Once you have completed the previous step, the first thing you should do is to check the software updater and click install now. This will ask to reboot the system.
- After rebooting, check if you can access the internet from Ubuntu or not. If not then try changing the network connection from Bridge to NAT.
- Now, the second thing you should check is copy-paste from Windows to Linux.
- Perform the below two commands to update the currently installed packages to the latest version:
Press CTRL+ALT+T to Launch a Terminal.

$sudo apt-get -y update (immediately update)
$sudo apt-get -y upgrade (takes some time)
$sudo apt-get update
If you get the below error, then it is possible that another installation is still in progress. Please wait till it’s completed or restart your machine.
E: Could not get lock /var/lib/apt/lists/lock. It is held by process 7942 (aptd) – open (11: Resource temporarily unavailable)
N: Be aware that removing the lock file is not a solution and may break your system.
E: Unable to lock directory /var/lib/apt/lists/
- Install vim tool
$sudo apt-get install vim
-
Install Java on Ubuntu:
- Download Java 1.8 from this link
- Copy it to a location (/usr/local/java)
$sudo mkdir /usr/local/java $sudo chmod 777 /usr/local/java $ sudo cp ~/Desktop/jdk-8u301-linux-x64.tar.gz /usr/local/java -- (copy file to Java folder) - Now, extract it using the below commands:
$ cd /usr/local/java $ sudo tar xvzf jdk-8u301-linux-x64.tar.gz $ sudo ln -s jdk1.8.0_301 jdk --- (creating alias name) - Once it is extracted, delete the tar.gz file
$ sudo rm jdk-8u301-linux-x64.tar.gz - Now, edit the system Path file /etc/profile and add the below lines:
$ sudo vim /etc/profile (open the file) Provide your password. #Press esc : $ , Press enter to go to the last line. Then press i to get into insert mode and go down JAVA_HOME=/usr/local/java/jdk JRE_HOME=$JAVA_HOME/jre PATH=$PATH:$JAVA_HOME/bin:$JRE_HOME/bin export JAVA_HOME export JRE_HOME export PATH - Let your Ubuntu system know the location of Java JDK.
$sudo update-alternatives --install "/usr/bin/java" "java" "/usr/local/java/jdk/bin/java" 1 update-alternatives: using /usr/local/java/jdk-14/bin/java to provide /usr/bin/java (java) in auto mode $sudo update-alternatives --install "/usr/bin/javac" "javac" "/usr/local/java/jdk/bin/javac" 1 update-alternatives: using /usr/local/java/jdk-14/bin/javac to provide /usr/bin/javac (javac) in auto mode - Let your Ubuntu system know that the above is the default Java JDK
$sudo update-alternatives --set java /usr/local/java/jdk/bin/java $sudo update-alternatives --set javac /usr/local/java/jdk/bin/javac - Now, Reload the etc/profile by using the below command
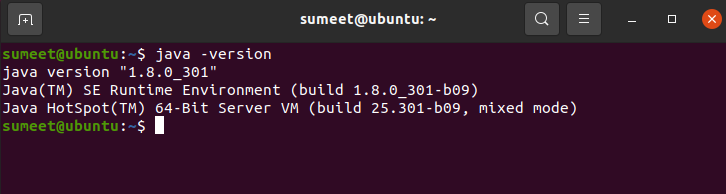
$ . /etc/profile - Once you refresh/reload the profile check Java is working well or not with the below command
sumeet@ubuntu:~$ java -version